Showing posts with label Sous Vide. Show all posts

Tuesday, July 21, 2015

More Rambling on Sous-Vide

Learn from my experiences.


I have some more observations about cooking proteins using the sous vide method.  Here they are in no particular order.

  1. You really ought to own a vacuum sealer.

    Since Sous-Vide means "under vacuum" this type of cooking is more about the bag than the bath.  The zip-lock/displacement method works well, but the added advantage of a vacuum sealer is totally worth the $80 you'll spend on it.  Having a food saver allows you to buy in bulk or at a better quality and store it in your fridge/freezer for longer without spoilage.  Costco sells a large pork loin (not the tenderloin) for less than $20.  From this I can cut two 1# roasts and 11 pork chops.  Bag in various quantities and I can cook pork for weeks.  Salmon fillets, especially the farm raised ones, run large and I can get at least 10 portions from that.  Preseason and bag.  The thicker ones are for main dishes and the thin ones for punching up a salad.


  2. Seasonings in the bag should be light.


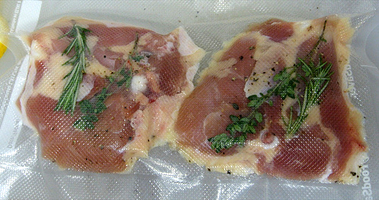
    When seasoning food before the vacuum you should use a light hand.  The reason is that if cooked in the bag the seasoning (particularly salt) has nowhere to go and so it goes into your food.  I recently seasoned a whole fillet of salmon as I would for oven or stove-top cooking and bagged it up.  When I used the water bath to cook 'em they were much saltier than I thought they should be.  Why? Well, on the stove-top or oven some of the seasoning comes off as fat is melted out of the food.  In the bag the fat may still come out but the solution of fat and salt come to equilibrium with your food due to the magic of osmosis.
  3. There isn't a reason not to buy the latest immersion pumps.


    I have tried all of the SV techniques listed in my first SV article.  The cooler and stove-top methods are good but require you to keep monitoring temperature.  The external thermostat is OK, but if anything goes wrong with the placement of its probe you can easily exceed the preset temperature for awhile and the food will be overcooked. Plus you have to move the bags around on long cooks so the water can circulate.

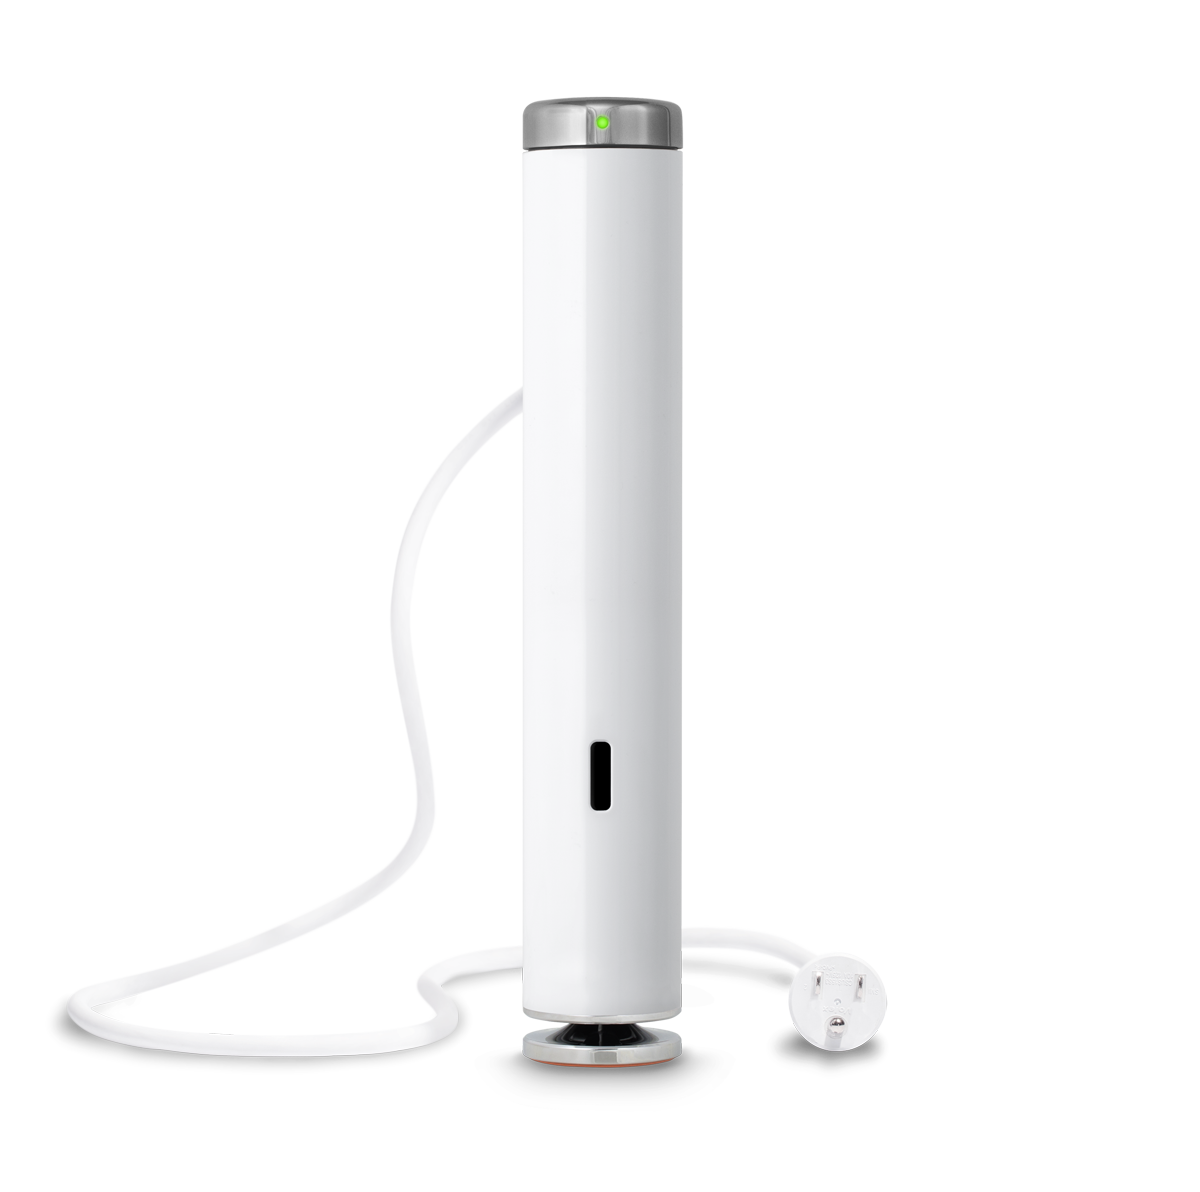
    Once I got my Anova Sous Vide Immersion Circulator I was in heaven.  Efficient heating, water circulation, cool looks, and precision control led to total confidence.  Recently Amazon.com had a "Prime Sale" and was selling the latest Anova Culinary Precision Cooker for $139.  I bought one just 'cuz. Although it has an 800W heating element (1000W in the previous model) it is more adjustable and has better electronics -- including Bluetooth so you can control it with your phone or tablet.  Please wait for a sale and buy one.
  4. Chill unused food quickly and reheat with the water bath.

    If you cook food SV that you are not going to sear and eat right away, please use an ice water bath to quickly get your food through the danger zone (45F-140F) before storing in the fridge or freezer.  One of the downsides to vacuum bagging is that any bacteria on the surface of the meat can become distributed throughout.  This is why knowing your safe combination of time/temp is so important.  But if you didn't succeed in killing all of the bacteria it can multiply while your food is cooling off in the fridge.  Take the extra time to give your food a quick trip below 45F and be sure to reheat completely following the time/temp guidelines.
  5. Salting at the right level helps meat retain juice.

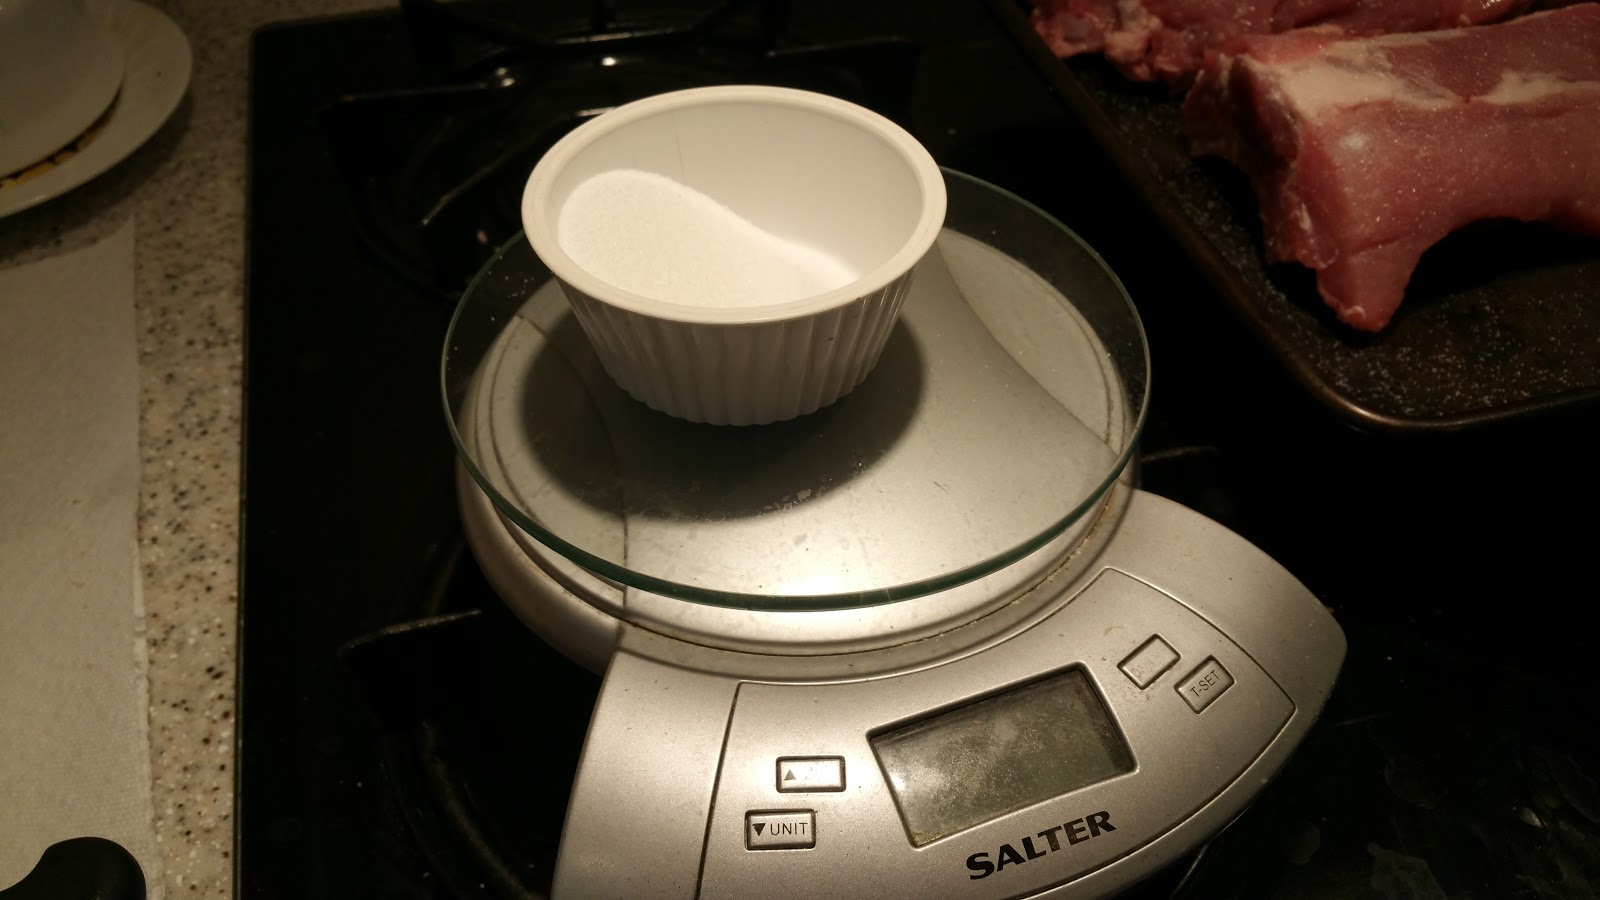
    Everyone from the guys at ChefSteps to Alton Brown celebrate the brining process.   Adding the correct amount of salt to the bag can actually help food retain some of its natural moisture.  Use the weights/amounts suggested by the "equilibrium brining" technique.

Monday, July 20, 2015

Smoky Sous Vide Baby Back Ribs

Look Ma, no smoker!


Since getting into Sous Vide cooking I have tried a few times to do BBQ/smoking with this technique.  I figured the "low and slow" mantra of slow cooking was a natural match for the water bath.  None of my attempts worked.  The most notable failure was a whole brisket that I vacuum packed with seasoning and liquid smoke and water bathed for 40 hours.  There was almost no smoke flavor but the meat was fork tender.

Recently the ChefSteps people were featured for their "Apartment Ribs" on the "Tested" you tube page.  So I tried it and modified it.  Then again, and again. Lately I served this iteration of the ribs for a group of 10 at a party and they were well received.  The main problem with the apartment ribs was the short (6 to 8 hour) cook time. Wifey likes fall off the bone ribs and that takes longer. Lots longer.

There are three steps to this recipe; the preparation of the rub (which contains charred onion and garlic for smoky flavor), slow cooking of the ribs, and finishing in a hot oven or grill.  You can watch the source material but here are my variations.  I separate the racks into 3 or 4 rib portions and vacuum seal with .5 to .75% salt.  Sous vide at 145F for 48 hours. After unbagging and patting dry I brush the ribs with a mixture of molasses and liquid smoke.  Sprinkle with my modified seasoning mixture and bake on the grill for 4 to 5 minutes to make a bark.

One note.  This makes a lot of the rub.  Go ahead and bag it up and use it as needed.

Here we go!  You'll need;
  • Some Baby Back Ribs (membrane removed)
  • Vacuum sealer (or displacement method)
  • Sous vide rig 
  • salt (.5% to .75% of rib weight)
  • 1 large onion sliced thin (mandolin)
  • 1 head of garlic peeled and sliced super thin
  • smoked paprika (not the regular kind)
  • smoked salt (if you can get it)
  • black pepper
  • mustard seed
  • celery seed
  • cumin
  • mace or fresh nutmeg
  • molasses
  • liquid smoke

Remove the membrane from the ribs if it hasn't already been removed.  Rinse the ribs and cut into 3 to 4 rib portions.

Salt the portions.  I used regular iodized salt, but you could use fancy salt if you'd like.


Bag them up and get them into the water bath.  Start the clock. 48 hours is plenty of time to do the rest of this.


Do the rest of this on the day you will serve your ribs.


Slice the onion and garlic exceedingly thin.  Lay out the onion on one parchment paper covered cookie sheet and  the garlic on another.  This is in case it takes one longer to char than the other.


Put them into a 300F to 350F oven for a few hours (3 for me) until they have browned and are brittle.


Let them cool and collect them together in the paper and pour into a bowl.  Crunch everything up into a coarse powder.


Weigh the coarse powder.  This is one unit of weight.  For me it was about 60 grams.


Now add the following spices to your charred onion/garlic;
  • 1.5 units of smoked paprika 
  • 2/3 unit each of smoked salt, black pepper, mustard seed
  • 1/2 unit each of celery seed, cumin, and mace (or fresh ground nutmeg).

This makes a ton of rub that can be ground in small batches as you need.  This bag is what I have left after 5 racks of ribs (about 15 pounds of ribs).  I'm gonna try it on salmon next.

You must grind this up to distribute the mustard seed and to get the right mouth feel.  I use a coffee grinder and pulse it a few times to get a fine coffee-like consistency.

Now make a wash from 2 parts molasses and 1 part liquid smoke.  I put it in a squeeze bottle if I'm going to be making a lot of ribs.

When it comes time to serve, remove the ribs from the bath.


Then remove from the bag and pat dry with paper towels.  Sous Vide meats are totally unappetizing looking but majorly delicious.

Brush on the liquid to the bottom side.

Then apply the rub.

Flip, and do the same to the top.

Put them into a 400F oven or on a med grill (lid closed) for approx 5 min.


Look at the results!


Bones are falling out.  One of the reasons I like to portion the ribs ahead of time is that they are difficult to cut after cooking.  If you have to cut them, do so from below so that you can see the ribs and not ruin the top bark.


Monday, May 4, 2015

Crispy Sous-Vide Chicken

You won't believe that it isn't undercooked.

I did a version of Michael Voltaggio's sous vide chicken thighs in the new rig tonight.  I took minimal pictures so I won't post this as a recipe until I do it again, but it is a winner.


The original recipe calls for skin-on but boneless thighs, but if your supermercado is like mine they have unmodified chicken parts or skinless-boneless chicken parts.  I decided to go bone in.  I added some time to the sous vide to account for the thermal mass of the bone.

Basically I patted the thighs dry and cut off the excess skin flap on each one.   I seasoned the bottom (non skin) side with garlic sea salt and lemon pepper.  Each piece was bagged with a half tsp of unsalted butter and a thyme sprig.  Vacuum away and place in a 145F sous vide bath for 2.5 hours.

After the cook, unbag the thighs and pat completely dry.  Scantly salt the skin and place (skin side down) on an oiled skillet (or griddle) over med to med-hi heat. Do the skin side for 5 min or until the skin is crispy but not burned.  Turn over for 2 min on the seasoning side.
Check out the quick potatoes in the background...

Plate and eat.  When I do the update I'll have to pretty up the plates with some color, but the flavor is awesome.
His and ...
Hers chicken and potatoes.

Sunday, May 3, 2015

New Sous-Vide rig!

Upgrade to the lifestyle.


I decided to treat myself for my b-day and bought an Anova sous vide circulator.  A great bang-for-the-buck unit that I got on sale because a new version is out.  I took the old rig out to the desert.  Of course I just realized that the roaster would've made a good deep fry rig...alas.

The vessel is a Coleman stacker 48 (30ish quart cooler) with a cutout in the lid.  Currently testing how long for it to take a full load of cool water to 150F.  

Tomorrow night I'll make some chicken thighs and try to remember to take pics so that we can have another recipe on this blog.

Monday, March 30, 2015

Sous Vide Steak

Steakhouse goodness!


As promised here is the lowdown on my sous vide steak process.

You'll need
  • a couple of high quality steaks
  • fresh rosemary and thyme
  • some steak seasoning
  • a vacuum sealer (or ziplock freezer bags)
  • a sous vide rig (see my article for options)
  • some steak butter (optional -- I'll post recipe later)
I season each steak and seal them up with one sprig each of rosemary and thyme.

These can be frozen or used right away.  The only difference is how much time they will spend in the water bath.  Minimum one hour from thawed and minimum three hours if frozen.

Set the water bath to 125 for medium rare steaks.


When the water comes to temp drop in the steaks and wait the requisite time.

After the sous vide bath, get the steaks out, pat them dry with paper towels and re-season.  Discard the rosemary and thyme.  They won't look very appetizing because they lack that charred outer crust.
 

Sear the steaks with a torch or 40 sec on each side in a very hot skillet.
 
Just look at the nice even crust that cast iron delivers.


Top with the steak butter and enjoy.
Steak is part of a well-balanced diet...
20130610-steak-cooler-video-.jpg